Want to learn the making process of quilted Christmas stockings? Read this entire blog that will show you a complete guide to piecing and sewing a wonderful patchwork stocking that you will definitely love hanging above the fireplace every year. Whether you make them for yourself or give them as gifts, quilt stockings are sure to become loved family heirlooms.

Quilted Christmas Stockings Pattern
The quilted Christmas stockings are a very simple project that both learners and experienced quilters will make and enjoy. They are the best project to experiment with, along with a new technique and pattern. These stockings are the best size to hold tiny presents – but they are not giant quilts – so they don’t take much fabric or time; also, it’s very simple to customize, and you will make it in just a few hours. You can also create any type of patchwork strike, like simple stripes, scrappy log cabins, or EPP blocks. To make this project easier, you can use two spare quilt blocks you have left up from other projects of quilting.
Here Are the Easy Steps to Create Quilted Christmas Stockings
- Firstly, make the patchwork for the front of the stocking, and you make the patchwork for the back if you want.
- Then, quilt the front or back stocking piece with batting.
- Next, sew the piece together in order to create the outside of the stockings.
- Cut and sew the two lining front and back pieces together.
- After that, sew the outside and lining, adding a hanging loop.
- Lastly, turn the stocking right side and topstitch around the opening.
Quilted Stocking Pattern ideas
- Most of the people pieced a simple patchwork grid pattern. If you wish to replicate the same design, you have to pair contrasting fabric colors together from a 5″ charm square pack. After that, put the blocks in the order in a standard grid with all the HST facing similarly.
- You can use any quilt block pattern that you love for the front of the stocking. These stockings are the best canvas to highlight star blocks, log cabin blocks, or improve piecing blocks.
- As you design your quilted stockings, recommend that the straight upper portion of the stocking measure 8″ at the widest point. After sewing the side seam, you will have a completed measurement of 7.5″. You will need to keep that in mind when you are preparing your blocks for the front.
Tools and Materials
To make these Christmas stockings, you will need a common line-up of sewing and quilting tools. For your fabric, you can use quilting cotton and linen so that you feel a certain quilting.
You can also use fabric from your stash or buy new fabric for this quilting project. For lining, you will also need fabric. You can cut the front and back pieces from the fat quarter if you want. So here is the list of materials and supplies that you will need for your quilting project:
List of materials
- Fabric: new or scrap cotton or other fabric for wilting. Remember that you can cut front and back pieces of lining from one fat quarter.
- Batting: ¼ yard of low-loft batting
- Ribbon: you will need 6″ of matching bias tape or sturdy ribbon for the hanging loop.
- Pattern template: download the free pattern template
List of supplies
- Matching thread
- Sewing machine
- Quilting mat
- Quilting ruler
- Rotary cutter
- Curved basting pins and straight pins
- Iron and ironing board
- Hand-sewing needle (optional)
- Fabric marker (optional)
A Step-By-Step Guide to Making a Quilted Christmas Stockings Pattern
Step 1: Create the pierced blocks for the outside of the quilted stockings
- Firstly, ensure to print out the free stocking pattern template for Christmas. Then, cut the piece of a template and tape them together.
- Now, it’s time to start creating the quilt blocks for the outside of the stocking. For this, you can choose to create patchwork for the front side of the stocking or for both sides.
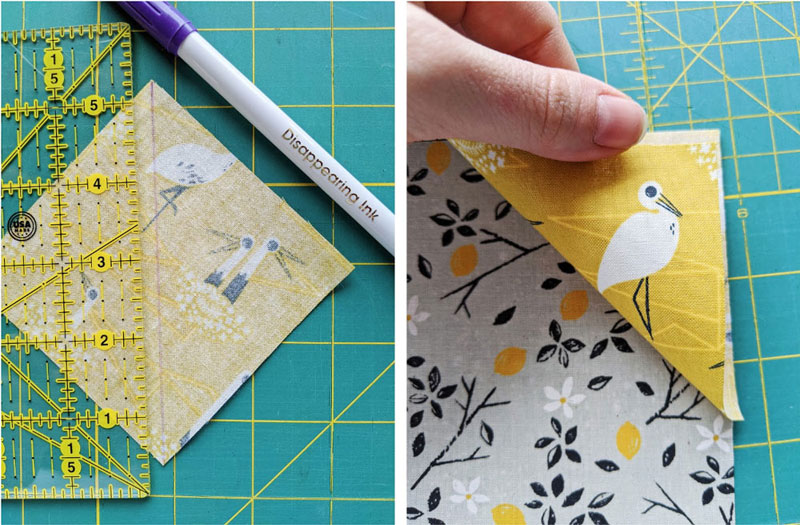
- After that, a 5″ charm square will provide you four 3.18″ un-completed HSTs, which you can easily trim to 3″ square. After they are sewn on all sides, they will be 2.5″, which is the perfect size for a stocking template.
- Whichever quilt block type you select, make the finished patchwork piece marginally larger than the pattern template. Once you have finished piercing, trim it to size. Trace the template onto the front side piece and cut it out.
Step 2: Quilt the both front and back pieces
- In This step, you will quilt the patchwork layer with a batting layer together.
- Then, cut the two batting pieces a bit larger than the pattern template. If the batting pieces are not cut perfectly, don’t think too much because you will trim them later.
- Baste both sides’ pieces of the stocking to both batting sides. You can baste with basting spray, stitches, or pins.
- Then, quilt the two pieces in any type of design you choose.
- Once you have finished the quitting process, trim both pieces of the stocking to size with fabric scissors or a rotary cutter.
Step 3: Sew both front and back pieces together
- Now, you will need to sew both the front and back pieces together to make the outer stocking layer.
- Then, pin both pieces together. Sew along the stocking edges with a ¼” seam wage. Notch the curves to create a smooth edge and eliminate bulk.
- Turn the stocking right side and use blunt tools or your fingers to ensure smooth curves.
Step 4: Cut the lining pieces and then sew them together
- Next, fold the lining fabric, right side together, and then place the stocking template on top. Then, trace the template and then start cutting the lining piece. This will provide you with two mirror-image lining pieces.
- After that, place the lining pieces together on the right sides. With ⅜” seam allowance, sew along the edges.
- Next, leave the top side open and a 5″ gap open along the bottom side.
Step 5: Attach the lining
- Now, it’s time to attach the lining. To do this, place the stockings inside the sewing lining. Then take care to line up the top edges and side seams.
- You can put a folded ribbon piece to make a hanging loop. After that, line up the folded ribbon’s raw edges with the stocking’s top edge. On the stocking heel side, align the ribbon with the side seam.
- Next, sew around the opening with ⅜” seam, then turn the right side out of the stocking. Tug the quilted outer layer down via the gap that you left at the bottom side of the lining.
- After that, turn the right side out of the lining. Find the gap at the bottom side of the lining pieces, and use your fingers in order to fold the raw edges in. Also, you can use clips or pins to protect the opening while you sew it closed.
- Lastly, thread a hand-sewing needle by using the matching thread and stitch the opening closed along with an unseen ladder stitch.
Step 6: Topstitch
In the last step, you can stitch around the top side of the stocking. This extra stitching will help keep the lining inside of the stocking. Also, it provides the stocking with a bit more polished finish.
Conclusion
The quilted Christmas stockings projects are the easiest project that beginners and experienced quilters will make. Also, they are the best project to analyze with a new technique or pattern. To make these stockings, you don’t need too much fabric or time. In the above section, you will see a complete guide to making these quilted Christmas stocking patterns within a few hours.