To learn how to use a flatten tool in the Cricut design space? This ultimate post will teach you everything you have to know about the flatten tool in the design space. Once you read this post, you will know what this tool does, where to find it, why and when you should use flatten, the difference between the weld and flatten, how to cut projects with flatten, and many more things. Once you learn how to use it, Cricut design space will be more fun to use, and you will create printable designs easily with flattening.
Flatten Tool Basics
The flatten tool is one of the five leading design tools for working with layers in the Cricut design space. Luckily the flatten tool is one that is far easy to understand. This tool combines various layers into a single-layer printable image.
What does Flatten do?
- This tool flattens down all of the chosen layers into one single layer.
- It removes all the internal cut lines from the layers. It does keep a single cut line around the external outline of the new merged image.
- After that, it changes the new merged image to a print and then cuts the layer.
Where to find the Flatten tool?
You will find the flatten tool in the Cricut design space mobile app or desktop program.
- On desktop: on your desktop, you will find the flatten tool in the layers panel, and in the right-click menu, you will also find the flatten function.
- On mobile: you will find flatten in the actions sub-menu in the toolbar.
Also Read: Complete Guide to Use Cricut Print and Cut
When to use Flatten tool
- The Flatten tool can be used anytime when you want to merge multiple cut layers into one print layer.
- You will use flatten to make your design for print and then cut projects.
- Use flatten when you wish to join two or more shapes into one shape that you wish to print and cut out as one piece. For example, you can easily combine shape and text layers to make organization labels with vinyl.
What objects can you use to Flatten?
You can use the attached tool on any type of object:
- Text from the text box
- Basic shape from the shapes panel
- Images from the Cricut access library
What do you need to use the Flatten tool for print layers?
- Before you can start printing your image, you will have to shift your image from a cut layer to a print layer. As you already know, most images and text with design space are cut layers, which means that a Cricut will cut around every individual shape.
- When you use a flatten tool, design space merges the selected layers in a single printable image. Using flatten tells Cricut design space that you have to print the complete image and make one cut around the external outline of the merged image.
Also Read: Everything you need to know about using Cricut Design Space
How to use the Flatten Tool
Now it’s time to open the Cricut design space and start work with a few examples. All you will need is the design space software and a Cricut machine. So here are the few basic steps to using the flatten tool.
- Firstly, Open the design space and start your new project. Just arrange two or more layers on the canvas screen of the design space.
- Then, select the layers that you need to flatten. You will see a gray bounding box around the images, and all the selected layers will be featured in the layers panel. After that, the flatter button will become active and turn black.
- Tap on the flatten button at the bottom side of the layer panel if you are on your computer. If you are using the Android and iOS app, you will find the flatten button in the actions menu at the bottom.
- Now, check out your results. After clicking the flatten option, the images will be combined into a single image. The new layer will be called “Flatten,” and now you can move, edit, and resize this layer, as you would with another image layer.
Few Common Things to Keep in Mind When Using Flatten Tool
- The flatten works on more than one or more seeable layers. If you have no visible layers selected, then the button will be greyed, and you won’t use it.
- You can use a flatten tool on a single or multiple layers. Flatten will turn a specific cut layer into an individual print layer. Then will merge multiple cut layers into a print layer.
- After using the flatten tool, all the individual layers are not able to be editable. It means that you edit the size, font, color, etc., of any component layers of your flattened design.
- Flatten will work whether all the layers are overlapping or not. The non-overlapping images will be cut as specific pieces, and the overlapping images will be cut as one single piece.
Difference between Flatten and Weld
Flatten and weld can seem alike, but they both are used for different determinations.
- The weld tool combines various cut layers into one single cut layer. When you use weld, all the layers become one specific color. And the resulting layer is not a “Print Then Cut” layer, and it is only a cut layer.
- On the other side, the flatten tool combines all the cut layers into one print layer. When you start using flatter, the layers keep their colors. And the resulting layer is not a standard cut later; it is only a “Print Then Cut” layer.
Also Read: How to Weld Text and Images in Cricut Design Space
Three ways to use Flatten
Now that you have learned all the flatten tool basics let’s open up the Cricut design space and give some examples. If you don’t have Cricut design space, then you can download it for free.
- Using flatten to create print, then cut labels
In this example, we will use the flatten button to merge text and shape layers into printable labels with the Cricut print and then cut feature. If you have never used print, then cut, then you should learn the basics. Print and cut is the best feature that tells your Cricut machine to cut around the external border of an image that you have printed on your home printer. You might be familiar with uploading a JPG as a print and then cutting an image. You can also use the flatten to turn any design into a print and then cut the image.
Let’s go through an example together:
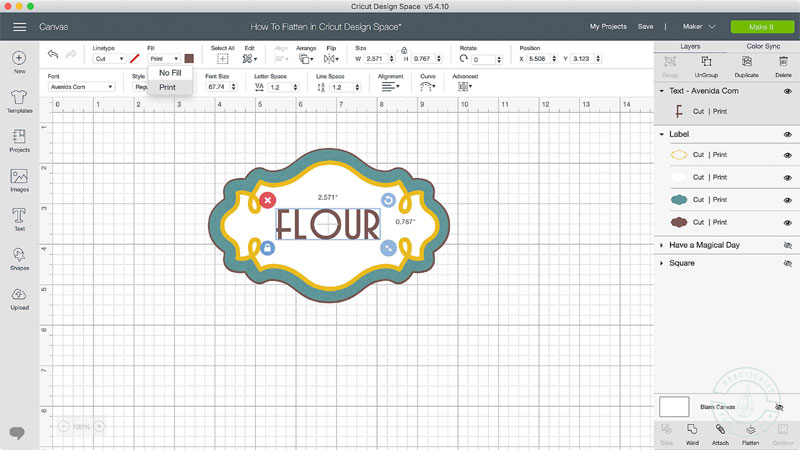
- Firstly, open up the Cricut design space and begin a brand new project. Add some shapes and text layers to the canvas. Every shape and text box is on its specific layer at this step, and you can edit them individually.
- If you were to tap “Make It,” then each design piece would be cut out on its cutting mat, and this is not what we need for this project.
- When you look at it first, the complete appearance of the design has not changed, but when you closely look at the layers panel, then you will see that the design has changed. First, all the layers have been combined into a single layer called “Labeled Flatten.” Second, all the aka overlapping cut lines have been removed. Lastly, the new layer has the “Print Then Cut” operation.
- Next, click the “Make It” option to send the design to the cutting mat, then you will see a different cutting mat preview. A white rectangle on the Cricut mat will show an 8.5″ by 11″ sheet of printed paper. On that printing paper, you will see a rectangular black outline. These outlines are the registration marks that your Cricut will use for accurate cuts. In the rectangle, you will see your image flattened.
- Using Flatten Tool to create printable stickers
Here is another example of using the flatten tool. Follow this example to learn how to make stickers with a Cricut machine.
- Firstly, add your images and text to the design space canvas. In this example, we use a heart shape and lines of text.
- After that, you will notice that the design pieces don’t overlap, and there is no background shape. Now we can flatten them, and they will merge all the shapes onto the background.
- The issue you will get is that since the heart shape and letters are not overlapping, concur machines will cut around every object individually. This is not going to perform for a sticker.
- Here is the solution you have to do: you can add a white background shape behind the heart shape and words. After that, you can flatten and merge all the shapes onto the background.
- There are some ways to add a background to this whole sticker, and you can add any basic shape from the panel of shape.
- If you wish to end up with a gap, you can use the counter tool to turn off that inside shape.
- After you have added the solid shape of the background, you can’t see the gridlines of the canvas through the design. This is a visual cue that you use to tell that the sticker will cut out as one piece.
- Using Unflatten Tool
Below, you will learn how to use the unflatten tool to undo the flatten button.
- Firstly, select the “Flatten Layer” that you wish to unflatten. After that, tap the “Unflatten” button. Again, this uses a heart shape and lines of text.
- When you look at the image, there is not much difference. But when you see the layers panel, you will see the individual shapes have been isolated into different layers. But you will also see that each layer is still a “Print Then Cut” layer. If you tap the “Make It” button, the Cricut will try to print and then cut all the layers individually.
- So if you wish to turn “Print Then Cut” layers into “Basic Layers‘, ‘then you will need to change each layer operation. Now, go to the top toolbar’s drop-down menu and select the basic cut from the menu. This will convert the layers into standard cuttable layers.
- The other way to undo the flatten button is the press undo button in the Cricut design space or Ctrl + Z on the keyboard.
Also Read: Ultimate Guide to Cricut Tools and Accessories
Final Verdict
Flatten is a tool that turns multiple-layered images into single-layered images. Also, it comes with so many uses, and you can use it to make some cool things. But it also has some specific rules you need to follow, which can be a little frustrating for you. In this entire article, you will learn how to use a flatten tool in the Cricut design space so that you can use your Cricut machine to combine multiple layers into one single-layer printable image.