The Slice tool is a handy feature inside the Cricut Design Space software that will assist you in doing beautiful projects with the Cricut machine. You can use Design Space all the time to slice text, crop images, and generate new shapes. The basic concept of the Slice tool is quite simple. Cricut Slice cuts a text or shapes from another shape. Although Slice is simple to use, it has some quirks that can bother new Cricut users. If you are new to Cricut, don’t worry. This detailed post covers all the essential information about the Cricut Slice tool.
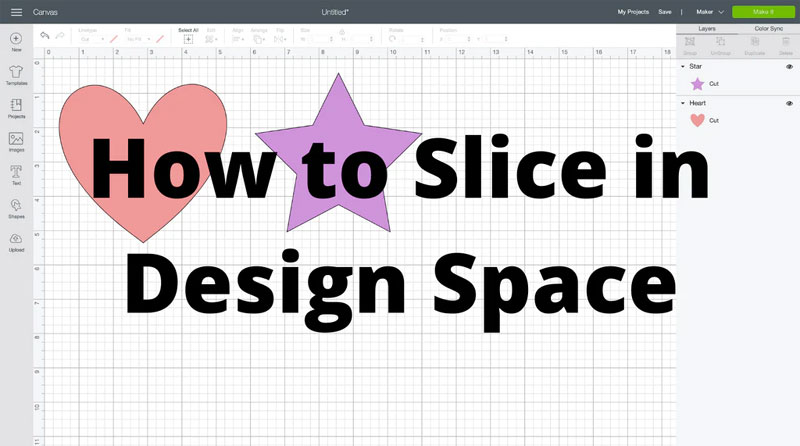
Slice is one of the best tools in Design Space that enables users to cut one shape out of another shape. You will find the Slice tool at the bottom right side of the Layers panel. This tool splits overlapping images into various pieces by cutting out one picture from another. Primarily, the Slice tool generates new cut paths where the sides of the pictures overlap. This tool works like a fancy hole punch or cookie cutter: it punches out an image (or shape) from the other image.
Also Read: How to Use the Cricut Monogram Maker in Design Space
Why is the Cricut Slice Tool Important?
Once you begin using the Slice tool, you will be surprised to know how much you can do with it. The Slice tool is specifically helpful for cutting out text and shapes from massive background shapes. Users can also utilize it for trimming or cropping away excess areas of the image.
Ways to Utilize the Slice Tool
- The tool punches out text and shapes from the vast background shape.
- Custom shapes generate new ones from the general shapes available in the Shapes panel.
- Trim or crop away spare parts of the image.
- Cut the image into several pieces, and separate the pieces into multiple layers.
- Rearrange and customize a ready-made picture from the Cricut library.
How to Use the Cricut Slice Tool
Users can utilize the Slice feature to cut out a shape from other shapes, cut text from a shape or cut overlapping shapes. Below are some critical steps for using the Cricut Slice tool.
- Arrange two pictures so that they overlap. Tap and drag the desired pictures so that the pictures overlap. If you Slice two separate pictures, everything will stay the same.
- Choose both layers. Using the Slice tool with pictures, you will work with two layers simultaneously. After choosing the layers, a gray box will become visible around both pictures, and each layer will become highlighted in the Layers panel.
- Hit the Slice tab at the bottom right corner of the Layers panel if you use a PC or in the Actions menu using Android and iOS apps.
- Check the results. To obtain the new shapes, you should separate the layers. Then you can edit each layer and delete the unwanted layers.
Also Read: How to Use the Cricut Foil Transfer Tool
Tips for Working with the Cricut Slice Tool
The Slice tool in Cricut Design Space is handy but not without quirks. Below are some suggestions and tricks to remember while using the Slice tool.
- The Slice tool works on two layers. While using the Slice tool with the images, users can work with two layers simultaneously. If they choose over two layers, the button will show gray light, and you will not be able to use it.
- Works on overlapping pictures. For using the Slice tool of Design Space, your images should be overlapping. If you Slice the pictures that are not overlapping, everything will go smoothly.
- Work on Grouped pictures, but only with the hidden pictures in the Group. If you wish to Slice any layer part of the multi-layer Group, you should first ungroup or hide the other layers to show the Slice tool.
- The slice tool works with text. Although, slicing with the text (particularly multi-layer text) has quirks.
Where to Find the Slice Tool
You will get the Slice tool in the Design Space smartphone or desktop app.
- On Desktop (PC): You will see the Slice tab in the bottom right corner of the Layers Panel, next to the Weld tool. Also, you can find it in the right-tap menu.
- On Mobile: You will find the Slice option in the Actions sub-menu between Weld & Flatten.
5 Methods to Use the Cricut Slice Tool
Now let’s begin with understanding some of the simple methods to use the Slice tool in the Design Space with examples.
Cut Text and Shapes from a Huge Background Shape
- In this example, you will learn about creating a gift tag. Choose a rectangle shape, the word Congrats, and a smaller circle.
- To do a new project, add a text box and shapes to the Cricut Canvas.
- First, choose the smaller circle to cut out a small hole in your rectangle gift tag so you get a spot to tie your desired ribbon. Then drag the smaller circle on the top of your rectangle. Choose both layers, tap on the Align tab and select the Center Vertically option to line them up. Next, with the selected layers, hit the Slice button. You will get the Slice Result on the right side of the Layers Panel.
- After that, you should repeat the procedure with the word. Drag the Congrats word on the top of your rectangle. Choose both layers, hit the Align tab, and pick the Center Vertically option. Now, tap on the Slice button with the layers to get the Slice result.
- Note: You can slice two layers at a time. So you should create the gift tag in two steps: Slice the smaller circle, and then slice the word.
Now check out the results.
- Firstly, you will see the original text layer and circle shape.
- Then, you will see the actual rectangle shape with the word Congrats, and a circle hole pushed out of it.
- Lastly, you will view the punch-out themselves sliced from the rectangle.
You might see more pieces on the Cricut Canvas than you expect, but it’s okay. When you see it closely, you will find that the results are like you have used a physical punch on the piece of cardstock. You will have the cardstock shape, the punch itself, and the circle you have pushed from the card.
Also Read: How to Use the Cricut Explore Air 2: The Complete Guide
Making a New Shape from the Standard Shapes
This example shows you how to create a crescent moon shape using two circles.
- Begin by tapping on the Shapes toolbar on the Canvas and selecting two circle shapes.
- To overlap the circles, drag any circle on top of the other. Select the Align option and hit the Center Vertically tab to line up the circles.
- With both the selected circles, click on the Slice tab. You will get the Slice Result layers on the right side of the Layers Panel.
Let’s check out the results. You will find that the Cricut Slice tool has cut the layers wherever the corners overlap.
- You will see the circle cut into pieces, overlapping with the other circle.
- Also, the original circle will be cut into pieces, overlapping the other.
- You can delete the unwanted layers.
Trim an Image
One of the fantastic ways to utilize the Slice tool is to cut a file or trim a premade design. In this example, you will know how to utilize the Slice feature to crop the undesired design elements from the Access Library image.
Begin a new project and select an image for the Cricut Canvas; for instance, create a Father’s Day Banner.
- To begin, add the square shape to the Cricut Canvas, and increase its size to cover the bottom border of the banner design.
- Drag the shape over your banner layer to overlap the area you wish to trim off.
- Then, choose both layers, and hit the Slice tab. The Slice Result layers will become visible in the Layers Panel.
Let’s check out the results. You will view four pieces: the part you sliced off, the original banner, the part of the rectangle that overlapped your banner, and the original rectangle. Delete the excess layers, and the banner design with four edges will remain with you.
Cut the Image into Different Layers and Pieces
Here is an easy method to use the Cricut Slice tool to split the desired image into numerous parts. In this example, you will know how to use this tool to cut a heart shape into two halves to make a split monogram.
- Navigate to the Shape menu in the left side toolbar to choose the heart shape in the Canvas. Next, in the same way, select a square from the Cricut Canvas.
- Change the size of the square into a rectangle, and drag it to overlap the heart. Also, you can select the Align option and hit the Center Vertically tab so that the shapes line up correctly.
- Choose both shapes and tap on the Slice tab. After deleting the excess layers, the heart is into two separate pieces.
Remember: Although the heart seems to split into two halves, the heart shape is still a single Slice Result layer. If you need to move the bottom and top pieces of the heart shape independently, you will require them to add them to their layers. To do that, you will have to slice the picture one more time.
Generate a rectangle & place it over the bottom half of the heart. Choose the rectangle and the heart, and hit the Slice tab again.
Rearrange the Ready-Made Image
Here is another method to utilize the Cricut Slice tool to rearrange or modify the premade design. We are selecting the “family is everything” quote in this example. It’s the image layer from the Cricut Images library.
- Begin with a new project and select the quote design for the Cricut Canvas. You will find the “family is everything” quote in the Layers panel.
- Next, you should cut it using the Slice tool and modify the quote. For this, choose the rectangle shape for the Canvas and change its size so that it overlaps the “everything” word.
- Choose both layers and tap on the Slice icon. Next, tap and drag both layers to separate them and check the results.
How to Use Slice with Text
You can also use the Cricut Slice tool to cut the text from another picture. This tool treats all the letters as a single layer. In many cases, using the Slice tool with text is similar to utilizing Slice with images.
- Attract the text layer to the Cricut Canvas, and change it with the text tools.
- Next, drag the text (or quote) to overlap the other layer.
- Then, you should choose the layers and tap Slice.
After using the Slice tool on the text layer, it will become the image layer. This means you can’t edit it anymore with the text tools, like letter spacing or font size.
Multi-layer Text
The Cricut Slice feature treats multi-layered text slightly differently than it works with other images. Below are those differences.
- You can utilize the Slice tool with the multi-layered text.
- Remove the hidden layers from the Cricut Canvas and the Layers panel. If you wish to keep the hidden layers in the project, you should ungroup them before utilizing the Slice tool.
Tips for Troubleshooting Common Issues
If you cannot use the Cricut Slice button, it is unavailable to utilize with the currently selected layers. Below are a few reasons why the Slice tool is not working.
- If you select one layer. To use the Slice tool, you should choose two layers.
- If you choose over two layers. The slice tool works with layers.
- One of the layers in the Group. To utilize the layer, Ungroup it before utilizing the Slice tool.
- Unhide the hidden layer before using the Slice tool.
How to Choose Two Layers in Cricut Design Space
You should choose two layers in the Cricut Design Space to use the Slice tool. Below are some methods to select more than one layer in Design Space.
On Desktop
- Tap and drag the selection box around different shapes to choose both.
- Next, you should press and hold the Shift button (on the computer) or the Ctrl button (on Mac) on the keyboard when tapping on every layer on the Cricut Canvas.
- Afterward, press and hold down the Shift button ( on PC) or the Ctrl button (on Mac) on the keyboard while tapping on an individual layer in the Layers panel.
On Mobile (App)
- Click on the screen & drag the selection box around the layers.
- On the Cricut Canvas, click on the layer to choose it, then press and hold on to the second layer to choose it.
- On the Layers Panel, click on one layer to select it, then press and hold on to the second layer to choose it.
Also Read: How to Use Flatten Tool in Cricut Design Space
Final Words
The Slice tool in the Cricut Design Space splits two overlapping text or images into multiple parts. Slice makes new cut paths from two shapes, resulting in entirely new shapes. Every unique shape will be visible in the Layers panel. Using this tool is a more confusing tool in Design Space. Not because it is tough to use but because there are a few quirks that can create problems for new users. In the above-detailed blog, you will learn about the Cricut Slice tool and different tricks and tips for making the most of the Slice tool.