Sometimes you find the best image in Cricut Design Space, but there is the number, name, or greeting you want to edit to make it perfect. Cricut got it and introduced Editable Images. Cricut has updated and included plenty of images in the Design Space software and made those images editable so that users can customize a different name, switch up the sentiment, or change the occasion.
Editable Images are images with personalization in mind. Change any word to fit the occasion, add family names, and even include an inside joke to enhance its relevance for you. After adding an Editable Image to Cricut Canvas, an editable text highlighted in blue will appear. Once you edit your desired image, the highlight will disappear. Besides the text, users can also edit almost anything in an image by utilizing the layer panel. Change the size, move the image elements, change the color or anything you wish to.
Read More: How to Use Flatten Tool in Cricut Design Space
Finding Cricut Editable Images
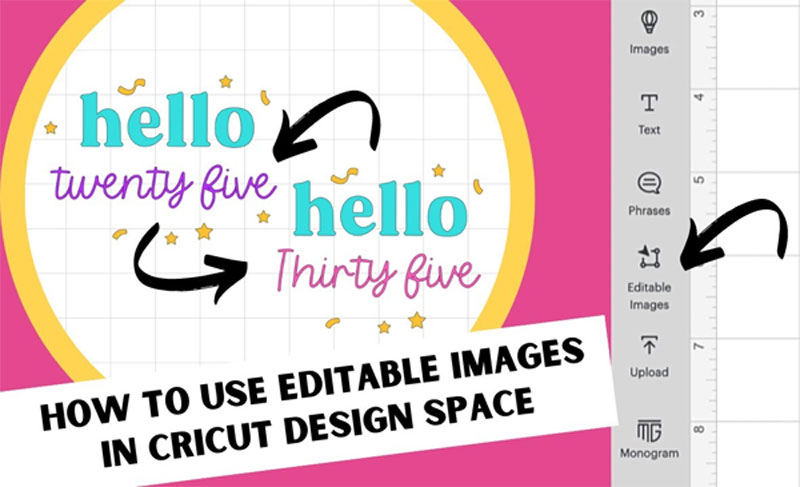
The simplest method to find the Editable Images in Design Space is to tap on the Editable image tab on the left-hand side of the Cricut Canvas or choose the Editable Text filter option in the Images section.
Also, you can find Cricut Editable Images beside other images in the Design Space software; search for the Editable Image tab at the bottom and the blue highlighted text in the image itself. When you hover the mouse over the top Editable Image tab, you will find a badge that reads this image is editable.
Pricing for Cricut Editable Images
When you search through the plenty of Editable Images in the Cricut library, you might notice that each has different costs. All the Editable Images are available in Cricut Access subscriptions, beginning from $0.
If you haven’t subscribed yet, don’t worry, individual Editable Images are accessible to buy with varying costs. Different designs have different costs, depending on the images, fonts, and shapes you use. Non-subscribers can already own additional images or fonts in the Cricut Design Space account to decrease the cost of the Editable Image and prevent overcharging.
For instance, if the Editable Image adds a premier font, the initial cost will add the license for including this font to your Cricut library. If your Design Space account already consists of that font, the cost will decrease so that you don’t have to pay for the font you already have. If you do not have the premier font but switch to the one you already have or a different one, the price might change; you will know the updated cost when you check before cutting an image.
What to Edit in Cricut Editable Images
You can change any in Editable Images. If the Editable Image adds an editable text, a highlight will appear on every text in the editable image. Do not worry; this blue highlight will disappear once you edit your text. Double-tap on the desired text to add edit mode and write the new text like when you generally include text in the projects. If the text is long to fit, change the font size to make it smaller.
Need to wrap the text? Move to the Alignment menu and choose the Wrap On option. With the text on a single line? Navigate to the Alignment menu and hit the Wrap Off tab.
Read More: How to Use Slice in Cricut Design Space
Choose the text and edit the font to anything already in your Cricut library if you need a non-Access font. To change a shape or other assets, move ahead and update it. Users can personalize the parts of the desired image displayed in the layers panel, resize them, move them, and change the color, usually any feature accessible for the layer you wish to edit.
Cutting any Editable Image is similar to cutting any other design; ensure to attach or group the way you require them to be, and tap on the Make It tab.
How to Use Cricut Editable Images
When you include an editable image in the Cricut Canvas, you can modify it.
- To edit the text, you should tap on the editable layer. So in this way, you can change Christmas, date, and Gabrielle. For instance, select the “baby’s first” text to edit.
- After that, you will find that your edited text will change to black. Then it will be cut on the same mat as the baby’s first text. Because of its different colors, the heat will cut on its cutting mat.
- If you want, you can edit the image more, editing things like the size, and colors, including other elements (such as replacing the heart with the easter egg from your Cricut library), or editing the operation king (including flattening for Print, then Cut feature). Usually, you can make any changes to a cut file or other image. You might have to detach or ungroup layers to initiate changes like this.
- After that, you can cut your image on the Cricut machine to create your project.
How to Edit the Images in Design Space?
In this guide, you will understand the procedure to edit a PNG image & separate it so that you can merge other elements and generate a new design.
- First, you must upload the image. Tap on the New Project tab to launch a blank canvas. From there, you can hit the Upload icon.
- Next, tap on the Upload Image tab once again.
- Then, select the Browse option.
- Choose the design you wish to edit. We are selecting the Cactus PNG bundle using the stated Design Bundles in this example. Select the Complex option and hit the Continue tab.
- Hit the Zoom icon and Zoom the section of the design you wish to keep. Now, tap on the Crop tab and trim your image.
- Use the Eraser tool to remove the excess parts of the design you don’t wish to keep.
- Tap the Preview option to check if you have erased the unwanted parts. Once you are ready, tap Continue.
- Now, save your file as Print, then Cut the design and hit the Save tab.
- Move back to upload an image and choose the desired image again to upload.
- Pick the design again, tap on the complex image option, and hit the Continue button. You will repeat the step, but this time you’ll delete the pot of the cactus.
- After that, tap continue and save it.
- Next, choose the pieces of the edited design and hit the Insert Images tab.
- Now, the images will be visible in the Cricut Design Space project canvas.
- Note: you can take different parts from any other image and mix & match them to make a new design.
Read More: How to Use the Cricut Monogram Maker in Design Space
Steps to Separate Images From Multiple Images in Design Space
- Let’s begin with launching the Cricut Design Space. Tap on the Upload Image tab in the left toolbar.
- On the next screen, you must hit the Upload Image icon again.
- The uploaded image will display on the screen. You will also see several images in the design, but23 you need a few pictures to separate them from the design. You must choose the moderately complex option and hit the continue icon.
- Then, tap on the Crop tool and trim the image you need out of a bigger image.
- After this, choose the magic wand icon. Tap on the background and the area you don’t need to keep around your image. When you are ready with your picture, tap on the Preview tab to ensure you have deleted all the unwanted things. Then hit the Continue tab.
- You must print and cut with this image, so remember to tap on the print and cut tab, not only the cut option. Rename your image and save.
- If you want other images from multiple images, repeat the procedure. After that, you can choose them and insert them into your design space.
- The images you need will be visible individually on the screen. Every image has its cut lines so that users can cut them individually rather than a complete design.
- Resize the desired image and hit the Make It tab.
- Finally, your image is ready to print & then cut.
- Also, you can insert white and black images like coloring in the pages and separate parts of your page from the rest to utilize as an individual design. Hit the Upload Image tab.
- With the uploaded coloring page, you can choose a more complex option.
- After selecting the desired image, tap on the Crop tool and trim the part of the image you want.
- Hit the Magic wand icon at the top left corner and remove the background you want.
- When saving the image, you must remember to save it as a print & cut, not only as a cut file. Rename the image and Save it.
- Now, you can insert your image into the Cricut Design Space, and your image has its cut lines. Once you are ready with your design, select the Make It option to print and cut.
- After that, you can print and cut the desired design on the print-and-cut page.
- Separating one or more images from one image is a helpful technique to learn. Users might need only a particular portion of a design for their project.
Read More: How to Use the Cricut Foil Transfer Tool
Summary
Editable Images in Cricut Design Space are usually the images in the Cricut Library with numbers and text that users can swap out to customize for their unique requirements. In the above comprehensive blog, we have shared all the essential information about Cricut Editable Images, like how to use them and find them. Presently Editable Images are accessible on the desktop version of the Cricut Design Space software, not in the smartphone Design Space apps.